
You’ll need a bowl, knife, cutting board, cabbage and sea salt, container for fermentation
I’ve been making sauerkraut for several years now. I remember the first couple of times being really nervous about fermenting anything—I didn’t trust the process. It just didn’t sound safe. After reading about the nutritional benefits of raw sauerkraut in Autoimmune Disease: The Cause and The Cure, I found that buying raw kraut in the store was about $8 a pint. I could make almost two quarts for approximately $5! So, I decided to give it a try. I’m sure glad I did! It is very easy to make, and is just about fool proof thanks to mother nature. Homemade kraut tastes so much better than anything you could buy in the store and is loaded with probiotics and enzymes that aid digestion. Here’s a very basic kraut recipe and procedures. The procedure is pretty much the same whether you’re making kraut, kimchee or fermented veggies, including pickles. I’ve bolded the basics in each step. Recipes for flavored sauerkrauts and other fermented veggies can be found on my Kraut Recipes page.
Note: The secret to fermenting success is to keep the veggies submerged in liquid. This will prevent failures and moldy, slimy kraut. Details are here on the Wild Fermentation web site and I recommend you read it. It will save you from ruining a batch and will give you peace of mind.

I like a variety of sizes in my chopped cabbage. The bigger pieces stay crunchier.
Ingredients
1 medium cabbage (about 4 lbs)
2 TB finely ground sea salt (I prefer the pink Himalayan)
1. Remove the outer tattered leaves and set aside for later use. Quarter and core the cabbage and then cut it into shreds and place in your bowl. Save the core for later as well. It’s your choice on the size of shreds — I like a variety as the bigger pieces will stay crunchier.
2. Toss the salt over the cabbage in the bowl and set it aside for an hour or so. The salt will break down the cells in the cabbage, causing them to release their juices. If after an hour the cabbage is still pretty hard (some cabbage is drier than others), you can massage it lightly using your bare hands. Don’t overdo it! The cabbage will soften during the fermentation phase and if you over massage it will turn to mush after a couple of weeks.

Softened cabbage with juices.
In this photo you will be able to see the juice in the bottom of the bowl. It looks good at this point, so I’m ready to put my cabbage in a fermenting container.
Containers: Rule #1 is don’t use anything metal—the acid created during fermentation will corrode metal. Yucky. You can use an old fashioned crock, a glass bowl or—my favorite—a half gallon canning jar. I have had the most success using the canning jar with an airlock lid. There is less surface to worry about and the airlock keeps out dust, bugs and air while allowing the gases created during fermentation to escape. The water in the airlock not only makes a seal, but also filters out some of the odors that may be associated with fermentation.
3. Spoon the cabbage into a clean container. Here I’m using just a basic Ball jar funnel to make things a little less messy. Once it’s full, press the cabbage down in the container using something firm: your pounder, a wooden spoon, etc. The cabbage should be packed in tightly, with extra juice at the top. If there isn’t a lot of juice, you can make some extra brine by mixing 1 tsp of salt with 1 cup of filtered water.

Pressing down leaves and core to submerge the cabbage.
4. Pack the saved leaves and core on top of the cabbage and press down. This will keep the shredded cabbage under the juice. This is very important! Details are here on the Wild Fermentation web site.
5. Add a cover to the container. If you’re using an airlock lid, assemble according to instructions. If you don’t have one, you’ll need to put something heavy on top of the leaves. You could use a small canning jar filled with water (no metal cans!), a smaller bowl with water, or if using a crock you can put a small plate on top of the leaves with something heavy on top. Some people even have a rock for this purpose. Then cover securely with a cloth, towel, paper towel, coffee filter or even a shower cap. DO NOT seal the container. Gases are released during fermentation and you could explode a sealed jar. I put a larger bowl, plate or Pyrex casserole under my container to catch any fermentation overflow.
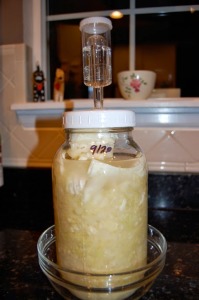
Ready to ferment!
6. Place your container in a cool, darkened area. I write the date in Sharpie on mine. I check it every 3 days or so to make sure it’s fermenting (bubbling) and looking good (good color, no mold or slime). If using the airlock, some of the juice may escape into it. No worries. You can open the jar after a week to smell and taste your kraut. Don’t taste it if the smell is off or it looks yucky. This will not happen if you’ve kept the kraut under the brine. Continue to ferment if you prefer a more sour flavor.
7. Once the flavor suits your taste, you can place the kraut in the fridge. I prefer to split mine into pint jars for easier serving. It will keep for months in the fridge. If you have any questions, please feel free to email me.
Recipes for various flavored krauts can be found on the Kraut Recipes page.


Very cool Deb. I love Rosemary, it’s great with food and all. But mostly for me it’s the smell, so wonderful.
Thanks John, I’m with you there! I usually add a good amount of rosemary to my sourdough bread, it works like a potpourri when I make toast. 🙂