Making a Pillow, a Beginner’s Sewing Project

I have a friend who started a small ranch-based combination animal rescue/learning environment for people with brain injuries (and at-risk youths). From her web site, Hope Farms Project (yes, I made her web site):

“Inspired by her son who suffered a stroke before birth, Lisa is committed to offering children, youth and adults with disabilities an opportunity to live up to their fullest potential. She believes that nature, nurtures. Lisa’s personal experience watching her son grow and heal in nature with animals has motivated her to leave the political job she loved and pursue her passion for animal-assisted social work. Hope Farms Project is the result of that decision and she has never looked back.”

pillowI’ve been volunteering my graphic design services to Hope Farms whenever I can and have also helped in her garden. This year she got the great idea of teaching homesteading skills to her students and asked me if I would do the honors. She knows I’m a bit of a jack-of-all-trades, make a lot of things from scratch and have a few homesteading skills myself. I jumped at the opportunity!

How to make a pillow

Homesteading students

Classes will be held the first Wednesday of the month and so the first one was April 6. The theme was sewing, the first project was to make a 12″ pillow. I thought it would be nice if I chronicled the classes here and it would give me extra things to write about. This was a good project to get the students familiar with a sewing machine, sewing by hand, using a pattern and how things “go together.”

Sarge waiting for his new pillow…

Learning how to sew at an early age has been the basis, I think, for many of my other skills, having used the knowledge to do things like build fences, tile my kitchen splashboard, design my own clothes and inventing a fabric pet-related product that I had sold on the internet for five years.

I’m trying something new with the project instructions: I’m using a plugin designed for recipes for the instructions! I think WP Ultimate Recipe would be pleased. You can find my instructions here: 

Pillow Making, a Beginner Sewing Project

how to make a throw pillowHere's a little project that can be put together in an hour or less. The size of the pillow is your choice. The instructions here are for a small (12") pillow. Note: You can print these instructions, the instruction photos will not print.
Cook Time1 minute
Total Time1 minute
Servings: 1 pillow

Ingredients

  • sewing machine
  • 1 - 13" x 13" pattern (optional) This can be made from printer paper, newspaper, etc.
  • 3/8 yard fabric
  • 1 pkg batting/stuffing
  • 1 spool thread & needle
  • several straight pins
  • 1 pair scissors or rotary cutter
  • iron (optional)

Instructions

  • Fold fabric in half, right sides (outside of fabric) facing together.
  • Optional: Make a 13" x 13" template/pattern out of paper, pin or weigh down on your folded fabric and cut (two pieces). Otherwise, just cut two 13" x 13" pieces of fabric.
  • With the two pillow pieces still right sides together, pin them on all four sides.
  • Sew seams on 3 full sides of the pillow with the sewing machine, 1/2" in from the edges. Partially sew the 4th side, leaving an opening large enough to fit your hand into.
  • Trim corners to an angle (a little bit, make sure you don't cut the stitches). This will keep the corners from bunching up when the fabric is turned right-side-out.
  • Reach into the pillow, grab the far end and pull it through the hole -- turning the pillow right-side-out. Push out corners by sticking a finger in them.
  • Optional but helpful: Iron the pillow flat, folding the unsewn seam edge to the inside. This will help you later when you hand-sew this last opening closed.
  • Stuff pillow with the batting. You can make it as full (firmer) or loose (softer) as you want.
  • Pin the opening closed with straight pins.
  • Hand sew the opening closed. That's it, you're done!

One thought on “Making a Pillow, a Beginner’s Sewing Project

  1. Akrilik Nedir

    I found this web page very successful because I found some useful information about the sewing machines and the project work related to the sewing threads.
    I am researching various information related to textile fibers and fabric printing techniques.
    Many thanks for sharing
    Best regards…

    Acrylic

    Reply

Leave a Reply

Your email address will not be published. Required fields are marked *

Pillow Making, a Beginner Sewing Project

Pillow Making, a Beginner Sewing Project

how to make a throw pillowHere's a little project that can be put together in an hour or less. The size of the pillow is your choice. The instructions here are for a small (12") pillow. Note: You can print these instructions, the instruction photos will not print.
Cook Time1 minute
Total Time1 minute
Servings: 1 pillow

Ingredients

  • sewing machine
  • 1 - 13" x 13" pattern (optional) This can be made from printer paper, newspaper, etc.
  • 3/8 yard fabric
  • 1 pkg batting/stuffing
  • 1 spool thread & needle
  • several straight pins
  • 1 pair scissors or rotary cutter
  • iron (optional)

Instructions

  • Fold fabric in half, right sides (outside of fabric) facing together.
  • Optional: Make a 13" x 13" template/pattern out of paper, pin or weigh down on your folded fabric and cut (two pieces). Otherwise, just cut two 13" x 13" pieces of fabric.
  • With the two pillow pieces still right sides together, pin them on all four sides.
  • Sew seams on 3 full sides of the pillow with the sewing machine, 1/2" in from the edges. Partially sew the 4th side, leaving an opening large enough to fit your hand into.
  • Trim corners to an angle (a little bit, make sure you don't cut the stitches). This will keep the corners from bunching up when the fabric is turned right-side-out.
  • Reach into the pillow, grab the far end and pull it through the hole -- turning the pillow right-side-out. Push out corners by sticking a finger in them.
  • Optional but helpful: Iron the pillow flat, folding the unsewn seam edge to the inside. This will help you later when you hand-sew this last opening closed.
  • Stuff pillow with the batting. You can make it as full (firmer) or loose (softer) as you want.
  • Pin the opening closed with straight pins.
  • Hand sew the opening closed. That's it, you're done!

Leave a Reply

Your email address will not be published. Required fields are marked *

Recipe Rating


My Secret Ingredient and a Camp Potatoes Recipe

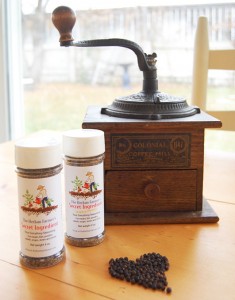
secIngredPeople often ask me what seasonings I use to make my foods taste so great, so today I’m sharing my secret ingredient. I call it, no surprises here, Herban Farmer’s Secret Ingredient. I make this myself, hand-grinding the peppercorns in an antique coffee mill which gives them a nice variety in consistency, adjusting the ingredient proportions and using sea salt, so that I finally have it the way I love it. And do I ever love it!

Although I have an entire kitchen cabinet devoted to spices, seasonings, oils… this is the one seasoning that I use so much that I have to make a new batch several times a year. Plus, I have a few friends that are addicted to this stuff and come to me with their empty jars for refills. Not to mention it makes great Christmas gifts! This seasoning just seems to disappear… but considering that I use it for breakfast (it’s great in egg dishes), lunch (great in salads, on sandwiches, in soup, etc), dinner (awesome on meat, fish, poultry, seafood, vegetables, mashed potatoes, in sauces, stews, soups, jeez, even on cottage cheese!) and anything in between (yes, try it on grilled peaches or vegetables, you can’t go wrong) it’s no wonder I’m always having to crank up the old coffee mill.

potatoesI’ve even had friends joke that it makes a great sachet for the underwear drawer and will also do in a pinch to melt snow off the driveway… but enough of the jokes. This seasoning has become my ~secret ingredient~ and I have decided to spread the wealth and sell it on my blog. Every bottle is filled with my personally hand-made Secret Ingredient. The price includes shipping and packaging (and that’s not cheap these days!). If you order any of my other products such as the fermentation kits, I’ll throw in a sample packet of my Secret Ingredient.

So… try it, you’ll LOVE it!

Here’s the perfect recipe to begin with. I’ve been making this for decades. Not only is it easy to make, delicious and satisfying, but it’s also the perfect dish to make when you’re camping. I’ve even backpacked into wilderness and made this—it’s so easy when all the prep (cutting up of food) can be done in advance and carried in baggies. You could also add some meat to this to make it a meal rather than a side dish. Diced ham is a nice addition. Want to get even fancier? Add some grated cheddar to the top and stick it under the broiler for a few minutes.

Potatoes with Peppers and Onions

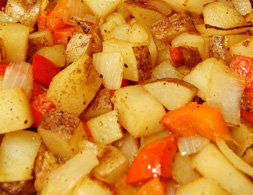
potatoesThThis side dish is delicious, satisfying and easy to make. It's also a great camping dish since you can do all the prep at home. This goes especially great with grilled trout. It can also be served as a meal, just add some protein (ham is good) and cheese at the end. It's also a VERY good breakfast dish paired with eggs.
Prep Time15 minutes
Cook Time25 minutes
Total Time40 minutes
Course: Main Course, Side Dish
Cuisine: American
Servings: 2 servings

Ingredients

  • 2 large russet potatoes unpeeled, cut into 1" pieces
  • 1 large bell pepper red or green, cut into 1" pieces
  • 1 large yellow onion cut into 1" pieces
  • olive oil about 3 TB or so
  • 1 tsp HF Secret Ingredient or to taste

Instructions

  • [Optional] Cook potatoes in salted boiling water for about 2 minutes. This will remove some of the sticky starch that would otherwise make the potatoes stick to your skillet. It also speeds up the cooking process. This step can be skipped, but just know the potatoes will stick more to the skillet. Drain and rinse potatoes.
  • Heat olive oil in a skillet, then add peppers, onion and potatoes. Sprinkle liberally with Herban Farmer's Secret Ingredient and sautĂ© until the vegetables are soft and browning nicely, about 20-25 minutes if you've parboiled the potatoes, about 30 minutes if not. You can add about 1/4 c of water and cover at this point to deglaze the pan.
  • If adding ham or cheese, that can be done at the end. Serve hot and enjoy!

6 thoughts on “My Secret Ingredient and a Camp Potatoes Recipe

  1. Joe Tropf

    Hi Deb,Just read your article in Mother. I’ve been playing with sourdough for close to 30 years. Cakes,breads and pancakes are #1. I started seeing a naturopath a few months ago and she wants me to get off of processed foods including flours so I’m looking into different flours to use for my sourdough with the help of a friend that is vegan and now she has gone grain free so more changes to the recipie. Anyway while reading Mother you mentioned the term ” To die for”. My question for you is, have you ever been close? Because if you have you would change it to “to live for” if something is that good you would want to eat it again. You see 7 years ago I was diagnosed with stage 4 throat cancer and went down hill from there. 4 months without eating watching the food channel 24–7 because eating was something to live for. If you haven’t gathered I don’t like that term or “Bucket list” either. To enjoy every day that I,m on top of this earth is what I told God I would do if given the opportunity. I hope to try your recipie someday. Until the next time enjoy life and have a good day. Joe Tropf

    Reply
    1. Farmer Deb Post author

      Hi Joe, Sorry, the terminology was not there to offend you or anyone. It’s just an expression. I grew up in the NY area, it’s commonly used. Imagine it being said with a NY accent. And yes, I’m also a cancer survivor, but I didn’t have as extreme an experience that you did. I’m so sorry for what you’ve been through, I can’t even imagine.

      I do hope you try the Einkorn flour, I don’t use anything else these days. You may want to take a look at the Jovial web site for more information about it’s nutritional value. I have a biscuit recipe if you want to try something quick with the Einkorn. It’s “to live for” good. 🙂

      Thanks for the good wishes and your comment. The last time I told someone to have a good day, they said back “have a great life.” I thought that was a wonderful response, so, Joe, have a great life!

      Reply
  2. Joe Cisneros

    Hi Farmer Deb. Do you ever do workshops on for instance making soap and other’s. If you do how do I find out about them or if I sign up for your post will you let us know that way. Where in Colorado do you live as I live in south central Colorado
    Joe Cisneros.

    Reply
    1. Farmer Deb Post author

      Hi Joe, I don’t really do workshops but have done demonstrations on making sauerkraut, for instance, for the local garden club. It’s interesting that you ask, because I have a friend that has a therapy ranch of sorts and wants me to do monthly demonstrations for making soap, bread, personal products (lotion bars, etc.), hopefully for homeschooled kids and others. If we she does get around to getting this organized, I’ll write a post about it here and include the schedule. Since you’re signed up here, you’ll get the post via email. But… this would be at her ranch in Elizabeth CO which sounds like it would be far for you. I’m near Denver myself. Maybe some day I’ll make some YouTube videos. 🙂

      Reply
  3. Debbie Johnson

    Hi, Farmer Deb,

    I was reading the above comments about Einkorn, and am actually right now trying out your No Knead Einkorn Sourdough Bread, the Eastiest Recipe Ever! It is raising in my kitchen as I write. One question to clarify — the recipe calls for Einkorn flour. Do you use the all-purpose or whole grain flour purchased from Jovial, or do you grind your own?
    Many thanks,
    Debbie

    Reply
    1. Farmer Deb Post author

      Hi Debbie! I buy the all purpose flour from Jovial. A friend gave me whole grain Einkorn from Austria once and the bread turned out like a brick. As I only use Einkorn flour here for all of my baking/cooking, I buy the 10 lb bag which brings the per pound cost down a bit. I hope you enjoy your bread!

      Reply

Leave a Reply

Your email address will not be published. Required fields are marked *