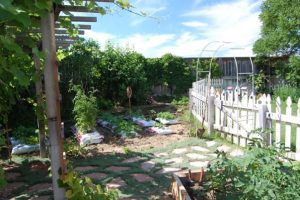
 The weather has been unusually warm this spring, which gave me a chance get a head start in the garden. Over the past 3 weeks I’ve spent an hour or so every day cleaning old leaves out of corners, adding two more raised beds, uncovering the garden path stepping stones that the chickens buried in dirt over the winter, adding bags of garden soil to the new beds and tilling in sheep and peat. Three overgrown lilacs were cut down, the stumps are dug and the plan is to make that spot a sitting area in the garden—a nice place to have coffee in the morning surrounded by lush gardens, birds and bees.
I’ve been gardening in Colorado since 1985 and it has been a struggle. All of the places I’ve lived had heavy clay soil. Our growing season is short: last frost date is in late May and some of our trees’ leaves begin turning color as early as July. The sun in the summer can be blistering, we don’t get much rain and when we do it usually also brings hail. But I’m a gardener through and through and just can’t make myself stop trying.
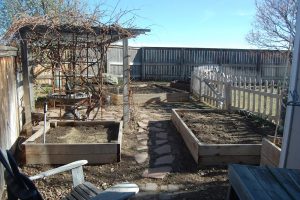 After struggling with our clay soil for about 10 years, diligently adding amendments and going as far as buying a rototiller to save my back, I finally saw an article in a magazine about raised beds. I’d seen them before but never gave them much thought since they looked expensive. But two years ago I decided to try just one. So now there is a raised bed on one side of the garden. It’s about 8′ x 10′ and about a foot tall. On the other side of the garden I tried gardening in bags of garden soil placed on the ground—sort of mini raised beds that you don’t have to build. Those worked out well too.
The raised bed was built with double stacked 6’x10′ treated wood planks. 4″x4″ posts were nailed in the corners with legs sticking out below. These legs were buried in the ground at different depths in order to make the bed level. Next came filling the bed with bags and bags of garden soil and some sheep and peat.
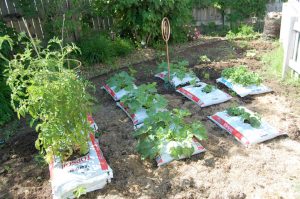 The soil bag garden was much less formal and permanent. I stabbed a weed puller a few times into the bottom of each bag and flipped it over so the holes were facing down. Holes were cut on the top side to insert plants. For deeper root plants such as tomatoes, I stacked two bags, cutting larger holes between them for drainage.
Both systems solved two problems I was having with gardening in our dense clay: the plants could grow in perfect soil, and drainage was perfect as well. You see, even though I amended and amended our in-ground garden both spring and fall for years, the clay seemed to devour the amendments yet never improved. Plus, I was basically trying to grow a garden in a large clay bowl with no drainage. Water would go through the amended soil and sit at the bottom, pooling in the clay that lay below. With the new raised bed, the water could drain through the nice soil and out of the bottom of the bed.
The following summer I added another large raised bed and two smaller ones and used the previous summer’s soil bags for filling. This year (2012) I added two more small ones and the garden is now complete. Rather than building them from wood again, I found raised bed kits at Walmart that are made from recycled plastic. I stacked two kits together for each bed. They look nice and blend well with wood beds. They probably cost about the same, were much easier to build (no hauling heavy planks home from the store; no cutting). They would also be much easier to relocate, if necessary. We’ll see how they perform this summer. [Update: these only lasted 3-4 years and warped so badly I threw them out.]
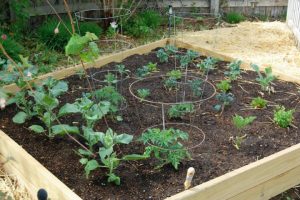 I’ve adjusted sprinkler heads to cover the beds, and when the plants get too large to water from above (the big leaves redirect the water in all directions), I have soaker hoses snaking through the beds to take over the job. I’ll update this post with my progress this summer.
I’ve been starting a lot of my plants from seed, sometimes starting tomatoes and peppers in January in order to have vegetables before the first frost. It’s a lot of work sometimes and not always successful. This Christmas I bought myself an LED grow light to see if I can keep vegetables or herbs growing indoors all year round. I’ve experimented with it, and I have to say it blew my mind. In January I planted a variety of vegetables and herbs and the growth was amazing. We were eating greens 4-5 weeks after planting seeds.
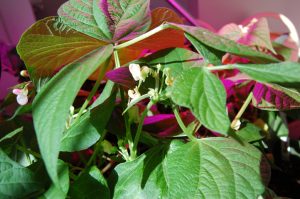 Green beans a week later. Growth was strong, healthy and incredibly fast! I was able to start some plants from seed that I’d previously had no success at all. So, I started my next batch of seeds a week ago, this time intended for transplanting to the garden in late May. I’ll do a separate post on what I’ve learned about increasing indoor seed starting success and my super duper booster LED grow light.

