Author Archives: Farmer Deb

Gazpacho Soup: A healthy and unique pot luck or block party contribution

I first heard about gazpacho back in the late 80s, while watching a hysterically funny subtitled movie from Spain entitled Women on the Verge of a Nervous Breakdown (ladies, Antonio Banderas is in it!)  ;-).  It tomatoes galoreseems they were always drinking and eating the stuff, and they made it look really delicious. It was not long after then that I found a recipe in Cook’s Illustrated and after trying a few different recipes, decided that was my favorite—with just a little bit of adjusting.

fresh summer vegetables for gazpachoI would make a batch every summer, when my garden was producing loads of tomatoes, peppers and cucumbers. It’s the most refreshing, delicious way to drink your veggies: much healthier than juice because you’re getting little more than a variety of fresh, wholesome raw vegetables (organic, especially if you grow your own) with the fiber included. Every time I’d serve it to friends they would say they’d never heard of it before, but they all loved it. They would then ask for the recipe, which I was always happy to share.

gazpacho in thermos or pitcher

Go low tech at gatherings with gazpacho in a pitcher or thermos and use plastic cups with spoons.

It wasn’t until I lived in a suburban neighborhood with one block party, pot luck or picnic after another that I realized gazpacho would be a great side dish to bring. I mean, really, how many more bowls of potato, macaroni or fruit salad does one need? NO ONE thinks of bringing gazpacho and so far it’s been a huge hit. I usually put it in a Rubbermaid pitcher with a lid, or a soup thermos and throw in some ice cubes to keep it chilled. The soup can just be poured into plastic cups (don’t forget spoons). Nothing can be easier to serve! And you don’t have to worry about it going bad (translation: no mayo) if it’s warm out. Since it’s more of a first course, it usually disappears quickly anyway. There are rarely any leftovers and everyone ends up loving it (even kids) and asking for… surprise!… the recipe. I also get the personal satisfaction of sneaking in something that’s so healthy at gatherings where the norm is hot dogs, chips, carb-loaded salads and too many sweets.

chopped vegetables for gazpacho

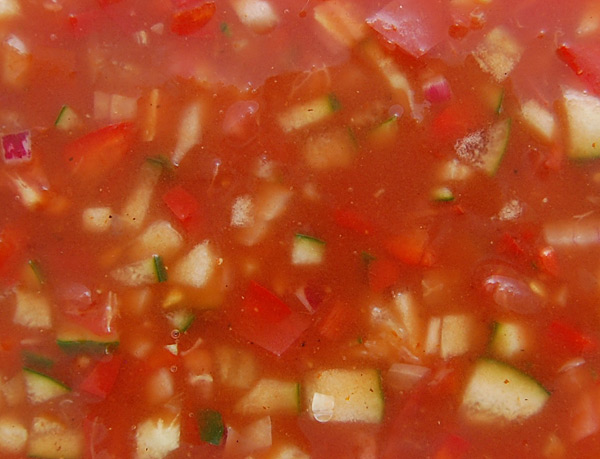
A nice dice size and variety for texture.

SO, here’s my recipe. I happen to LOVE cutting up vegetables (it’s my Zen activity) so I do all of mine by hand, but if you’re not as wacky as I am you can use a food processor or even a hand chopper (such as something like this OXO chopper ). The goal is to chop the fresh veggies into small enough pieces so that they can be swallowed easily (without the necessity for chewing) but big enough so that there is a nice texture and some “tooth” to the soup that can be chewed if so inclined. I usually bring along a few cups filled with toppings (my favorite is avocado) so people can dress up their soup to their taste.

Yum! Summer in a cup! Make some gazpacho soon and send your admirers here for the recipe!

Gazpacho (cold vegetable soup)

A fresh, delicious and healthful combination of summer's bounty.
Caution: Will cause cravings!
Prep Time1 hour
Total Time5 hours
Course: Soup
Cuisine: Spanish
Keyword: cold soup, soup
Servings: 3 quarts

Ingredients

  • 1.5 pounds ripe tomatoes diced into 1/8-1/4" cubes
  • 2 medium bell peppers,1 each red & green diced into 1/8-1/4" cubes
  • 2 small cucumbers diced into 1/8-1/4" cubes
  • 1/2 medium sweet red onion diced into 1/8-1/4" cubes
  • 2 medium garlic cloves pressed or minced
  • 2 tsp sea salt
  • 1/4 cup apple cider vinegar I prefer Braggs, unfiltered and raw
  • 1/8 cup sherry (cooking wine is fine)
  • to taste ground black pepper
  • 5 cups vegetable juice V8 organic is great
  • 1 tsp hot pepper sauce Sriracha or other types - optional
  • olive oil extra virgin, drizzle when serving

Instructions

  • Combine tomatoes, peppers, cucumbers, onions, garlic, salt, vinegar, sherry and pepper in a large non-reactive bowl. Let stand until vegetables begin to release their juices, about 5 minutes. Stir in the vegetable juice and hot pepper sauce. Cover and refrigerate at least 4 hours, 1 day preferable.
  • Adjust seasonings and drizzle about 1 tsp olive oil per serving. Serve cold with any combination of toppings: croutons, olives, chopped hardboiled eggs, diced avocados, parsley... or ?? your choice.

Gazpacho (cold vegetable soup)

closeup

A nice variety of diced vegetables.

The goal is to chop the fresh veggies into small enough pieces so that they can be swallowed easily (without the necessity for chewing) but big enough so that there is a nice texture and some “tooth” to the soup for those who choose to chew. I usually bring along a few cups filled with toppings (my favorite is avocado) so people can dress up their soup to their taste.

Gazpacho (cold vegetable soup)

A fresh, delicious and healthful combination of summer's bounty.
Caution: Will cause cravings!
Prep Time1 hour
Total Time5 hours
Course: Soup
Cuisine: Spanish
Keyword: cold soup, soup
Servings: 3 quarts

Ingredients

  • 1.5 pounds ripe tomatoes diced into 1/8-1/4" cubes
  • 2 medium bell peppers,1 each red & green diced into 1/8-1/4" cubes
  • 2 small cucumbers diced into 1/8-1/4" cubes
  • 1/2 medium sweet red onion diced into 1/8-1/4" cubes
  • 2 medium garlic cloves pressed or minced
  • 2 tsp sea salt
  • 1/4 cup apple cider vinegar I prefer Braggs, unfiltered and raw
  • 1/8 cup sherry (cooking wine is fine)
  • to taste ground black pepper
  • 5 cups vegetable juice V8 organic is great
  • 1 tsp hot pepper sauce Sriracha or other types - optional
  • olive oil extra virgin, drizzle when serving

Instructions

  • Combine tomatoes, peppers, cucumbers, onions, garlic, salt, vinegar, sherry and pepper in a large non-reactive bowl. Let stand until vegetables begin to release their juices, about 5 minutes. Stir in the vegetable juice and hot pepper sauce. Cover and refrigerate at least 4 hours, 1 day preferable.
  • Adjust seasonings and drizzle about 1 tsp olive oil per serving. Serve cold with any combination of toppings: croutons, olives, chopped hardboiled eggs, diced avocados, parsley... or ?? your choice.

How to Make the Easiest T-Shirt Skirt in 30 minutes or less

This has to be the easiest and cheapest project I’ve even undertaken. And the results are the most comfortable skirts I’ve ever worn! They are like wearing your favorite sweats, but even better. Truthfully, they’re like wearing nothing!

t-shirt skirt

Green, easy, comfortable and cute—What’s not to love?

These skirts are made from (men’s) t-shirts. I had a medium shirt that someone gave me a few years ago which I never wore. I’m really not a t-shirt kind of person because they are so shapeless and bulky. And this one was too big, but I kept it because it had horses on it. Men’s tee shirts can be bought for almost nothing at places at Goodwill or Saver’s. They are not necessarily “ABWs” either (Already Been Worn), if you’re squeamish about wearing some stranger’s pitted-out clothes. Too many people buy things they never wear, but thankfully eventually donate them.

grey t-shirt skirt

This was an XL shirt, resulting in a longer and more “gathered” skirt

Trying to decide what size shirt to buy depends on your body size, how long you want the skirt to end up being and whether you want it form-fitting or flouncy and gathered at the waist. My men’s medium fits me comfortably, the XL grey one is longer and is more gathered. Both are cute, comfortable and equally easy to make.

What you’ll need:

• A sewing machine and thread;
• One men’s t-shirt, your choice of size;
• 1-1/2” wide elastic;
• Scissors (or my choice, a straight edge, rotary fabric cutter and cutting board);
• Some chalk or some other marker;
• Straight pins.

Instructions:

[NOTE: Click on these photos to make them larger so you can actually see something.]

t-shirt cut for skirt

Cut across the sleeve bottoms.

1. Cut straight across the t-shirt, right under the sleeves. The t-shirt bottom is now your soon-to-be skirt.

Mark 8 equal spaces on skirt edge.

Mark 8 equal spaces on skirt edge.

2. Mark, with pins, both sides and front & back centers of the cut edge of the skirt top. Mark equally between these four pins, for a final total of eight. Folding the skirt pin-to-pin makes marking the centers fast and easy, without the need for actual measuring. They don’t have to be that precise.

3. Cut a piece of elastic the size of your waist, overlap the ends about 3/4” and sew, flatly, together.

mark elastic for t-shirt skirt

Mark the elastic in 8 equally spaced places.

3. Place, with chalk or other marker, 8 equally spaced marks along one edge of the elastic. The easiest way to do that is lay the elastic flat on a surface and mark both sides. Fold in half and mark in the folds (front & back). Repeat the folding and marking to mark the spaces between the marks already made. Did that make any sense?

Elastic and fabric pinned for t-shirt skirt

Match pins and chalk marks.

4. Pin the elastic to the outside of the skirt top, matching the pins with the chalk marks. Overlap the elastic at least 1/2” over the fabric.

5. This is the only slightly-tricky part: You need to sew the elastic to the skirt top, which is bigger than the elastic. All you need to do is grab the elastic/fabric in front of and behind the sewing machine needle, from one pin to the other, and stretch the elastic until it’s the same size as the fabric.

Sewing elastic and fabric in t-shirt skirt

S-t-r-e-t-c-h the elastic to the size of the fabric and sew.

It may take a little practice, but you’ll get used to the process quickly and will sew the elastic and fabric together within 2-3 minutes. In the photo you will see that my machine has a double needle. I JUST discovered this little gem and it’s my new favorite thing! The double needle automatically adds stretch to your stitches and a perfectly even top-stitch like you see on jean seams. Love!

Trim edges on skirt

Clean up the edges if you must. No one will see them but you…

6. That’s it. You’re done. Unless you want to clean up the inside of the fabric where it rests against the elastic. Use your scissors to trim any unevenness that may offend your sensitive need for perfection. And now enjoy what will become your favorite skirt!

Could that be any easier? Feel free to email me with any questions.