Category Archives: Uncategorized

How to Make the Easiest T-Shirt Skirt in 30 minutes or less

This has to be the easiest and cheapest project I’ve even undertaken. And the results are the most comfortable skirts I’ve ever worn! They are like wearing your favorite sweats, but even better. Truthfully, they’re like wearing nothing!

t-shirt skirt

Green, easy, comfortable and cute—What’s not to love?

These skirts are made from (men’s) t-shirts. I had a medium shirt that someone gave me a few years ago which I never wore. I’m really not a t-shirt kind of person because they are so shapeless and bulky. And this one was too big, but I kept it because it had horses on it. Men’s tee shirts can be bought for almost nothing at places at Goodwill or Saver’s. They are not necessarily “ABWs” either (Already Been Worn), if you’re squeamish about wearing some stranger’s pitted-out clothes. Too many people buy things they never wear, but thankfully eventually donate them.

grey t-shirt skirt

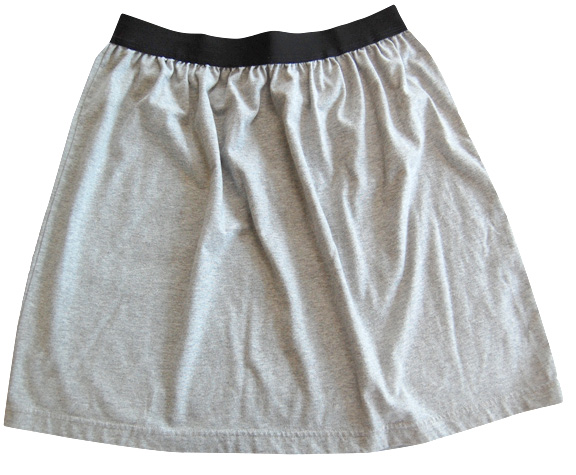
This was an XL shirt, resulting in a longer and more “gathered” skirt

Trying to decide what size shirt to buy depends on your body size, how long you want the skirt to end up being and whether you want it form-fitting or flouncy and gathered at the waist. My men’s medium fits me comfortably, the XL grey one is longer and is more gathered. Both are cute, comfortable and equally easy to make.

What you’ll need:

• A sewing machine and thread;
• One men’s t-shirt, your choice of size;
• 1-1/2” wide elastic;
• Scissors (or my choice, a straight edge, rotary fabric cutter and cutting board);
• Some chalk or some other marker;
• Straight pins.

Instructions:

[NOTE: Click on these photos to make them larger so you can actually see something.]

t-shirt cut for skirt

Cut across the sleeve bottoms.

1. Cut straight across the t-shirt, right under the sleeves. The t-shirt bottom is now your soon-to-be skirt.

Mark 8 equal spaces on skirt edge.

Mark 8 equal spaces on skirt edge.

2. Mark, with pins, both sides and front & back centers of the cut edge of the skirt top. Mark equally between these four pins, for a final total of eight. Folding the skirt pin-to-pin makes marking the centers fast and easy, without the need for actual measuring. They don’t have to be that precise.

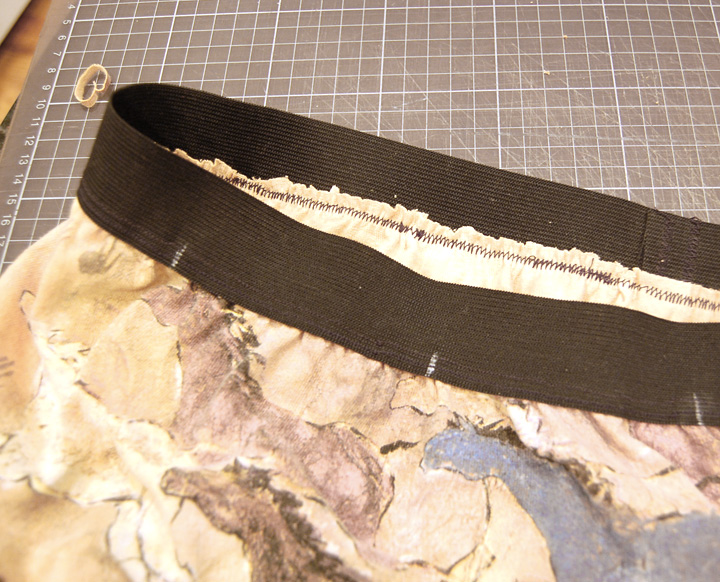
3. Cut a piece of elastic the size of your waist, overlap the ends about 3/4” and sew, flatly, together.

mark elastic for t-shirt skirt

Mark the elastic in 8 equally spaced places.

3. Place, with chalk or other marker, 8 equally spaced marks along one edge of the elastic. The easiest way to do that is lay the elastic flat on a surface and mark both sides. Fold in half and mark in the folds (front & back). Repeat the folding and marking to mark the spaces between the marks already made. Did that make any sense?

Elastic and fabric pinned for t-shirt skirt

Match pins and chalk marks.

4. Pin the elastic to the outside of the skirt top, matching the pins with the chalk marks. Overlap the elastic at least 1/2” over the fabric.

5. This is the only slightly-tricky part: You need to sew the elastic to the skirt top, which is bigger than the elastic. All you need to do is grab the elastic/fabric in front of and behind the sewing machine needle, from one pin to the other, and stretch the elastic until it’s the same size as the fabric.

Sewing elastic and fabric in t-shirt skirt

S-t-r-e-t-c-h the elastic to the size of the fabric and sew.

It may take a little practice, but you’ll get used to the process quickly and will sew the elastic and fabric together within 2-3 minutes. In the photo you will see that my machine has a double needle. I JUST discovered this little gem and it’s my new favorite thing! The double needle automatically adds stretch to your stitches and a perfectly even top-stitch like you see on jean seams. Love!

Trim edges on skirt

Clean up the edges if you must. No one will see them but you…

6. That’s it. You’re done. Unless you want to clean up the inside of the fabric where it rests against the elastic. Use your scissors to trim any unevenness that may offend your sensitive need for perfection. And now enjoy what will become your favorite skirt!

Could that be any easier? Feel free to email me with any questions.

How to Make (Real) Soap

I’ve had many people tell me that if they were stranded on a deserted island, I would be their first choice of a partner. It’s not because of my charm. It’s because… there’s a bit of MacGyver in me. I was the kid who dismantled broken clocks, watches, appliances… and as an adult was able to put some of them back together, without any many parts left over. Just ask Wendy, my old roommate. 🙂 I’m always learning how things are made, and usually try to make them myself. Just because.

I made soap for the first time about 20 years ago. Of course, I had to buy beef fat to render into tallow — no wimpy bottled oils for my soap! It was fun and successful enough for me to repeat the process. But then life got busy and I left soap making for my future.

Which came about last year, when I challenged myself to make, from scratch and with safe and natural ingredients, as many household and personal products as I could. I found a really nice bath/body bar soap recipe and love the gentle, moisturizing soap so much that I’ve stuck with that same recipe ever since. This recipe happens to be mostly vegetarian (depending on how you view beeswax) and I use all organic, food-grade ingredients. Well, except for the lye. Lye is… lye.

Making soap is EASY and will be successful if you follow the directions. The most important thing to remember is that there is chemistry behind the “turning fat into soap” process ( Saponification ) and so the ingredients must be measured accurately. Lye can also seem scary to people, but if you are careful and smart about handling lye it is not a problem. Get careless and you could burn a hole through your flooring, counter top, clothes, skin… you get the idea.

So here’s the process. You can skip directly to the recipe if you’re experienced in soap making. Continue reading

Moisturizing Soap

If you’ve never made soap before, I recommend you review the complete step-by-step instructions on this page: https://theherbanfarmer.com/how-to-make-real-soap/

NOTE: ALL MEASUREMENTS ARE BY WEIGHT, not by measuring cup.

Moisturizing Soap

This is a gentle, foamy moisturizing soap that you will love! It's easy to customize with fragrances, textures (ground cloves, herbs, etc). My favorite oil is tea tree because it's so skin-friendly, but I also love lavender, frankincense, clove with citrus... NOTE: ALL MEASUREMENTS ARE BY WEIGHT, not by measuring cup.
Prep Time1 hour
Cook Time1 hour
Total Time2 hours 6 minutes
Servings: 2 pounds (about 12 bars)

Ingredients

  • 9 oz coconut oil
  • 2 oz shea butter
  • 2 oz cocoa butter
  • 1 oz beeswax shaved or pellets
  • 9 oz olive oil
  • 5 oz castor oil
  • 3 oz sweet almond oil or can use Jojoba oil
  • 4 oz filtered water
  • 6 oz coconut milk (or more water)
  • 4 oz lye (drain cleaner; can be found in hardware stores)
  • 1/2 oz essential oils (optional)

Instructions

  • Prepare your mold (plastic shoebox lined with wax paper).
  • WEIGH your fats/beeswax and place in a large stainless pot. Melt on low temperature. When melted, set aside to cool to 100° F.
  • WEIGH lye in a baggie, slowly pour into container of WEIGHED liquids (water or water/milk combo) (see main instructions for precautions). Set aside to cool to 100° F.
  • Weigh essential oils and set aside for later.
  • When melted fats and lye water are both as close to 100° as possible, pour the lye water into the fats and alternate using a mixer and stirring by hand until mixture begins to trace.
  • Stir in essential oils and other ingredients you like (ground cloves, herbs, cinnamon, etc.)
  • Pour into the mold, wrap in towels and let sit in a temperate place for 24 hours.
  • Remove soap from mold and cut into bars. If you make the bars about 1" x 2" x 3", you'll get 12 or so.
  • Place bars on a rack with good air circulation and let it harden for 6 weeks. Don't use the soap before 6 weeks, as the lye can still be active.