Author Archives: Farmer Deb

Caring For an Injured Chicken

Spoiler Alert: If you don’t want to read all of this chatter, there’s a list of helpful hints below.

This is my third year of keeping chickens in the suburbs. When we started out, I worried about them being attacked by hawks, foxes and coyotes. Although I live in uber suburbia, this is Colorado and the land our thousands of homes exist on was once a cattle ranch. Continuous development displaces wild animals and they sometimes end up too close for comfort. I realized that. However, several years ago the foxes that had preyed on the local rabbits, cats and the occasional miniature dog were killed and eaten by coyotes. The coyotes eventually left our area because they had depleted their food supply. We relaxed our precautions a little.

Three weeks ago I was headed out to visit my extremely sick horse. Fifteen minutes into the drive I got a text from my teenaged son that a coyote had been in the back yard and attacked our free-ranging chickens. My son saw a coyote next to our 6′ fence with one of our chickens, Jenny, in his mouth. The coyote dropped her and jumped the fence, but Jenny was injured. Another chicken was missing. I immediately headed back home.

When I got to the back yard, I was able to coax Jenny out of hiding. She had a gash across her back, from wing to wing, exposing bone and fat but without much bleeding. It was a gaping wound, about 1/2″ in width and maybe 3+ inches across. She was missing a lot of feathers, had another 1″ wound under her right wing and a lot of puncture wounds. Her left ear was bloodied and her right eye was closed. But she was alert, responsive and complaining loudly.

We put Jenny into one of my portable folding parrot cages and headed east — my horse vet was about 5 minutes away from where I kept my horse and the vet was available for the emergency. He put 5 stitches in her big wound, 2 more in the smaller one under her wing, and sent us off with antibiotics, pain killers and some eye salve for her right eye which was swollen and closed but didn’t have any obvious injury. Back home, I put Jenny into a dog crate in the sunroom, gave her love and medicine and tried to get her to eat or drink. I  noticed she was having trouble getting food into her beak, like she couldn’t open it very much. I soaked her pellets in water, gave her her favorite foods (fresh corn, off the cob for now, chopped ham, etc.) in little wet pieces. Her beak looked like it was misaligned, top and bottom, and I thought maybe the coyote broke her jaw when it clamped down on her head. I decided to hold off on the oral meds the next day, thinking I would only hurt her more by forcing her beak open. I kept a close eye on her wounds to make sure they weren’t getting infected since I wasn’t giving her the antibiotics. They started scabbing over the next day. She started opening her right eye after a few days and it was dilated, possibly permanently, and her vision was off. She was still having trouble eating because of her vision problems, but after a few days was able to adjust and now has more luck zero-ing in on food. Her beak realigned and a piece of it fell off three weeks after the attack. I’m thinking her jaw and beak were injured which were making eating painful for her, but the jaw was not broken. She’s doing well now.

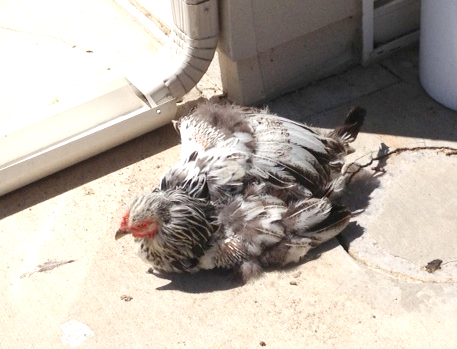
Tiggy getting some solar therapy.

Two days after the attack I was watering some dry spots on our lawn and saw movement out of my peripheral vision. There was a completely bedraggled Tiggy, the missing chicken, picking through the gravel along our west side fence. I have to say that, for the first time in my life, my brain could not interpret what I was seeing. It turns out she had been badly roughed up and hid behind our trash cans for 2+ days — no food or water. I picked her up and put her in the chicken run, and she could not stop drinking. She had been bitten 2-3 times. There were many puncture wounds on her back and tail area and she had huge bald areas from torn out feathers, but her wounds were all scabbed over and not looking infected. Her down had acted as a bonding agent to close the wounds. I borrowed a second dog crate from a neighbor and Jenny and Tiggy spent their nights in the sunroom, for about a week.
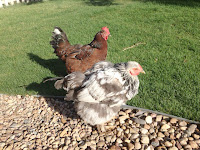
Tiggy & Jenny

Jenny and Tiggy have both had amazing recoveries. I have to say I’ve learned a lot from this experience about the body’s innate ability to heal and repair itself. Jenny did just fine without her antibiotics. Tiggy was seriously wounded and yet her body was able to heal itself beautifully with no medical intervention at all. I kept a close eye on both chickens daily to make sure infection was not setting in. Both chickens rested a lot when they were recovering, continued to eat and were very drawn to stretching out in the sun. Wounds have healed, feathers are growing back, their personalities are returning. A week or so ago I clipped and removed Jenny’s stitches. For the most part, that would have taken care of itself as well: the stitched skin had mended, died off and was sloughing off scabs, dry skin and the stitches as well. I just didn’t want one of the other girls pulling out a stitch the hard way.

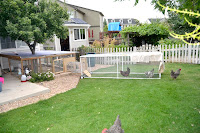
We’ve built a chicken tractor that we can attach to our chicken run to give the girls more space when we need to go somewhere. We still let them free range when we’re at home, but only if we are within close range and can keep an eye out for them.


Helpful hints: here’s what I learned about dealing with an injured chicken:

“Chunnel” connecting the tractor to the run.

1. If the wound is large like Jenny’s was, it will need stitches. Take your chicken to a vet. The vet will clean out the wounds, suture them and send you home with pain killers and antibiotics. It’s not cheap, my vet charged $100, but a portion of that was for medicine.

2. A wounded chicken cannot be left alone with other chickens. They will be attracted to the wound and will cannibalize the injured one. You will need to keep them in separate housing, such as a dog crate. You can let them out for fresh air, sun and exercise if they can handle it, but don’t leave them unsupervised, even around other chickens! I was able to let our two wounded girls out with the flock in the daytime, but kept them in crates at night. Who knows what goes on in a chicken coup all night.

3. Keep a close watch on the wounds to make sure they are not getting infected. Likewise, keep a watch on their demeanor and appetite. If you see changes in either one, there’s something wrong and they need to be seen by a vet. They should be getting better every day, not worse.

4. If your chicken is not eating, you can try adding water to their pellets or feeding them things you know they love. If they are not interested in food a day or so after the injury, something is wrong! Jenny loves corn on the cob but she would not eat it. I realized there might be a problem with her jaw so I cut the kernels off the cob and she devoured them — she just couldn’t poke her beak into a cob to tear them out herself. Scrambled eggs are a great treat, cut up little pieces of meat or fish, macaroni & cheese — I was willing to give her anything to get her appetite going again. Plus the extra protein can’t be bad for a healing body.

5. Vets use dissolving sutures these days, but after 7-10 days, depending on how the wound looks, you can remove them. I did this because one of our chickens picks on Jenny and I didn’t want her pulling out one of the stitches! I used a pair of manicure scissors to snip the knots and tugged out the stitches with tweezers. A few were stuck and I just trimmed them as close to her skin as I could and left them to dissolve on their own.

6. Time line: An injured chicken’s wounds should start scabbing over the next day. They may act “out of it” for a day or so, but should gradually get back to eating well and doing the usual chicken things. In a 3-5 days even the larger gaps in the wound will scab over. New swelling, heat and redness around a wound means infection. Some skin patches around the wounds may dry out and harden. This will eventually peel off, while the skin below heals. I trimmed some of this off so the other chickens wouldn’t be tempted to do it themselves. A week after injury the wounds should start looking better and could take 2 weeks or more for the dead skin and scabs to fall off. Feathers could start growing back in 7-10 days.

7. If you keep a chicken separated from the rest of the flock too long, they will treat her like a stranger when she returns and will peck at her. You should keep an eye on them to make sure everyone is getting along. A chicken that does not have all of its feathers is vulnerable–pecking chickens will break her exposed skin, especially if it’s a healing wound. You can also buy or make a chicken saddle to protect her healing back. I made a chicken saddle for Jenny in about 20 minutes and she had no problem wearing it. You can find my instructions and pattern download on Mother Earth News.

8. A breaking beak is apparently not all that uncommon. I found a great blog post on how to repair a broken beak with superglue and a piece of tea bag. I suppose a silk wrap nail repair kit would work as well.

That’s it! Let me know if you have any questions.

I’m back! At least I hope so.

This year so far has been very difficult for me and I haven’t had the time or energy to keep up with my blog. But I’m hoping that’s all behind me now and the rest of the year will settle down.

Even though I haven’t been able to write, I’ve been blogging in my head for months. There are so many topics I want to cover! Dealing with coyote attacks on chickens, taking care of seriously injured chickens, the “do chickens feel emotions” debate (spoiler: yes), chicken tractors, chicken saddles, mysterious life-threatening horse illnesses, putting your dog down, my various garden experiments this year with new tomato varieties, my Snip-n-Drip Soaker System from gardeners.com, hoop houses, new recipes, canning foods, getting creative and frugal in the kitchen. I just don’t know where to start! Maybe I’ll just put this up and let it stew for a while. I’ll follow my impulses to what topic to tackle first.

I’ll close with a panoramic photo of my garden area from the new sitting space we added recently. How did I ever live without my iPhone? Panoramic photos, videos and my friend Pro HDR are SO convenient! :=D

Starting a Garden from Seeds

Farmer Deb (on left), maybe age 8?

My first experience with germinating seeds was when I was about 5. A neighbor had cleaned out their attic and tossed everything out on their curb for trash pickup. The local rug rats (myself included) thought we’d died and gone to heaven. We went through the entire pile and found loads of treasures. One that I found was an unused kid’s plant growing science experiment kit. It had little clear plastic pots, vermiculite and some radish seeds. When I planted the seeds and they sprouted, I was fascinated with the entire process. Imagine having nothing more than dry dirt and some brown specks and water turn into living, green plants! For years after that I tried to make terrariums in an old 5 gallon fish tank with garden soil and some seeds I’d swiped from our canary’s food dish. When we no longer had Tweety Bird, I would go through our spice cabinet looking for seeds to grow. Actually, I still do that!

Proof that I have a green thumb!

I survive the majority of winter by planning my next garden. Usually after Christmas the seed catalogs start coming in the mail and I’m like a little kid, decades ago, with a new Sears Catalog, closely examining the “enhanced” photos of glorious healthy vegetables at their peak. After a couple of weeks I come to my senses and order only a few packets of things that I know will grow in my garden. Colorado has a very short growing season and so I focus on vegetables that have the shortest growth times from planting to harvest — less than 60 days. I look for the most disease-resistant varieties I can find, without going down that GMO road. Some seeds I don’t even need to buy. If I buy a particularly nice organic winter squash, I’ll save some of the seeds for the garden. I’ve also done this with peppers and tomatoes in the past, but ran into problems with wilt. Most of the time the vegetables I buy in the grocery store have been grown in different areas in the U.S., or otherwise, and may not have resistance to certain organisms found in Colorado. Or maybe they were grown in greenhouses in more sterile conditions. Last year my gorgeous Black Krim tomato plants grown from a Whole Foods tomato purchase succumbed to Fusarium Wilt, just as the tomatoes were growing. It was seriously disappointing. On the other hand, I’ve had really good luck with seeds I saved from a package of Cherub tomatoes. Those little tomatoes are delicious and the plants are incredibly prolific.


My personal priorities for buying seeds and nursery plants are:

1. Vegetables that I use the most get top priority. Once in a while I’ll try something on a whim, like last year’s stevia plant. It did well, I dried the whole thing at the end of the summer, and it’s still sitting in my pantry with the tea. But I know that all year long I use tomatoes in many, many soups and sauces. We love fresh green beans and they are easy to grow and can be prolific. Summer squash is versatile and I use it often. There are a lot more varieties available by seed than in the grocery. I use a lot of Anaheim Chilis for green chili (we char them on the gas grill) and a favorite soup recipe. We love broccoli and use it a lot: steamed, raw, in other dishes. I use broccoli leaves like chard or collards, steamed or sauteed. There are actually a lot more edible veggie plant parts than we are lead to believe! I also grow herbs that I use a lot: basil, parsley, oregano, thyme, rosemary, bay, lemon balm. What I have left over in early fall can be dried or preserved in other ways. I have to say I’ve become fond of keeping just one celery plant in the garden. I don’t use celery all that much, usually a couple of stalks here and there in a recipe and have had store bought celery go bad. A living celery plant all summer is very handy, I just go out and rip off what I need and rest continues to grow. And the flavor of home grown celery, like a lot of other produce, is amazing.

2. Plants that have a short growing period vie for first priority. With tomatoes and peppers, I start the seeds indoors at the end of February. Other plants are started based on their harvest times, some seeds even get planted directly into the soil. Still working on the timing of those, but they tend to be carrots, lettuce, arugula. I need to pay more attention to Mom Nature and note which plants resulting from reseeding (seeds dropped from the parent plant the previous summer) start up. I’ve had arugula, carrots, tobacco, some flowers, oregano and dill do this. Tomatoes reseed, but too late to produce fruit. They haven’t caught on yet.

3. Plants that are hardy, again very important! Another major consideration. I typically don’t grow things that I know won’t grow here. I also choose resistance to as many diseases as possible without going GMO.

4. Vegetables, fruits and herbs that can be preserved. Whether by freezing (broccoli, summer squash, various peppers and basil in a pesto sauce); canning and/or pickling such as tomatoes, apples, pickled cukes and okra, green beans, grapes; dehydrating such as tomatoes, herbs, garlic; culturing such as cabbage for sauerkraut, carrots, leafy greens, radishes, kohlrabi; or “root cellaring” like green tomatoes, root vegetables and winter squash. Why should you only reap the benefits of an organic garden during the short summer season?

Starting from seeds vs. buying seedlings – some FAQs
Why buy seeds vs. seedlings? My first thoughts are: more variety, monetary savings and the pleasure of growing something yourself. I’ve been starting my own plants for decades, but when early summer hail storms destroy everything I’ve worked towards, I end up replacing my home-grown plants with store-bought ones. On the up side, buying store-bought usually means getting what is hardy for where you live. But, there’s also the lack of variety involved with buying store plants. Yet, if a hail storm has destroyed my garden I’d rather go boring than go nothing at all. If cost is an issue, consider that an entire package of seeds costs less (usually) than buying one commercial seedling.

What’s involved with growing from seed? Growing plants from seed is interesting, rewarding and fairly easy. My favorite incubator is one of those plastic trays with a clear plastic lid, 6-cell trays fit inside. It just takes some seed starter mix (make sure you use this, it’s fine and sterile and a happy medium for seeds), some seeds and water. Starter mix should be mixed with water until spongy. Fill the tray cells with the starter, use a pencil to poke some holes in the dirt, toss in 2-3 seeds and cover with a teensy bit of soil. General rule of thumb is bury the seed with soil 2x the size of the seed. Make sure you mark your trays with a Sharpie or tags so you know what you planted. I put my trays on top of the fridge since the temperature is fairly warm and consistent. Seeds do not need light until they sprout through the soil. Some seeds sprout quickly — tomatoes can take just 3-4 days, peppers can take a week or two, carrots take forever. If you’re in a hurry, a heating pad under the tray helps. Check the seeds every day for growth and water needs. The ones that have sprouted need to be removed from the incubator so they can get some light and air circulation. As they outgrow their little cells, you’ll need to transfer them to bigger containers and start introducing your actual garden soil into the mix. Make sure they don’t dry out, and add some plant food here and there.

Indoor green beans.

Do you need a grow light? In the past I was able to successfully grow seedlings on window sills, in our sunroom or under fluorescent lights. Last winter I bought myself a full spectrum LED grid light — the choice of marijuana growers here in Colorado.  I kept track of the growth of the seedlings throughout the winter and was BLOWN AWAY by the results. The plants grew super healthy and stocky in an amazingly short period of time. The plants flowered and I actually had little green beans while the plants were in 4″ planters. I am using that same light this year with tomato and pepper seedlings and am again amazed. I have the light on 12 hours a day, on a timer, and my tomatoes and peppers are growing at record rates with NO LEGGINESS at all. Plants that don’t get enough light tend to grow tall and spindly (leggy), searching for the light.

In the pot: grow light collards;
on the counter, sunny window grown.
BIG DIFFERENCE!

These plants are deep green, stocky and very happy. Next winter I’m going to experiment with keeping tomato plants alive and producing throughout the winter with my LED light.

Why not collect your own seeds from store-bought produce? As mentioned before, saving seeds from store-bought veggies don’t always work out, as some of those plants are just not meant to be grown in my (or your) climate and may succumb to diseases they are not resistant to. There’s also that question of how long it takes for the produce to grow from planting time.

Why deal with those little 6 cell packs? Why not just go for a bigger pot to start off? One year, not long ago, I thought, “why not just put those tomato seeds in a big pot and save myself some work?” Well, the little plants spent all of their energy growing roots to fill all that dirt, and never put any thought into growing their above-ground parts. So, there is a real reason to start small and graduate the planter size. At least in our colder climates where growing season is an issue.

Do I need to use seed starter and potting soil for my plants? In the beginning, yes. But to avoid transplant shock when you finally add your plants to the garden, you should have your seedlings in 100% of your garden soil by then. Otherwise you’ll slow down the growth (harvest time) of your veggies.

What else do I need to do? The first thing that comes to my mind is don’t forget to “harden off” your seedlings. That means to the weather, the sun and to wind. I’m thinking Colorado again. Seedlings, especially those who have not had a grow light, will be a little spindly. If you put them out in the garden without hardening off, they will be shocked by the night time temps, burned by our relentless sunshine and beat to a pulp by our wind. If your plants are spindly, you need to add a fan to their daily routine. The fan will blow on them and cause them to thicken their stems. To introduce your plants to sun and night temps, you’ll have to put them outside for for increasing amounts of time so they get used to nature. http://www.tomatodirt.com/harden-off.html You can use this info for all of your seedlings. Kind of makes you wonder how plants have survived without human intervention, doesn’t it? Well, the fact is that we, in modern times, grow plants in our climates that otherwise would not have a chance of surviving.

So…

In Colorado, unless you have a greenhouse, gardening is still a crap shoot. There are hail storms. Bunnies. Late freezes and snow. Early freezes and snow. Diseases. Unseasonable weather. Technical difficulties. In the 30 years that I’ve lived here, even under the worst circumstances, gardens eventually take care of themselves and produce some degree of satisfaction and sustenance. Growing my plants from seed is very satisfying and really not difficult. And when Mom Nature has other ideas, there’s always Whole Foods. So, happy gardening and never give up!